Microsoft Teams Calling Phone App Training Guide
Table of Contents
- How to Sign into the Microsoft Teams Calling App?
- How to Sign Out of Teams
- How to Make Calls
- Dial a Number
- Call a Contact
- Speed dial
- Groups
- How to Check your Voicemail
- How to Answer a Call
- How to Put a Call on Hold
- How to Transfer a Call
- Start a Call from a Chat
- Manage Your Call Settings
- Call Answering Rules
- Configure Voicemail
- Device Settings
- General Settings
- Delegation
- Make and Receive Calls as a Delegate
- Notification Settings
- Manage Blocked Calls
How to Sign into the Microsoft Teams Calling App?
How to Sign Out of Teams
1. Click your icon image at the top right of the application.
2. Click Sign out option at the bottom of the drop-down list.
How to Make Calls
1. Click the Calls Icon on the left navigation bar.
Call options display as well as a Dial a Call button.
Speed dial – The speed dial contacts display.
Contacts – Lists all of your contacts. Search for and call a contact.
History – Lists call history.
Voicemail – Listen and manage voicemail messages.
Click the Dial a number button or Click the receiver icon under one of the speed dial contacts or Click Contacts from the Calls option list and search and call a contact.
Dial a Number
1. Enter a 5 digit or 10-digit phone number.
2. Click the purple Call button.
The Call Automatically Initiates. Once in a call, there are several options available.
Depending on the type of call there may be additional options:
Call a Contact
1. Click contacts from the Calls option list.
2. Use the Find a contact field to search for a contact.
3. Click on the phone icon beside the contact to make a call. Can also start a chat, video call, email, add the contact to the speed dial list or remove the contact.
4. Click the Add contact button to add a contact.
Search for and Add the Contact to your list.
Speed dial
1. Click the Add a contact to this group button to add additional contacts.
2. Enter the contact information.
3. Click Add.
Groups
1. Go to Chat  on the left, select the Chat dropdown at the top, and then select Contacts.
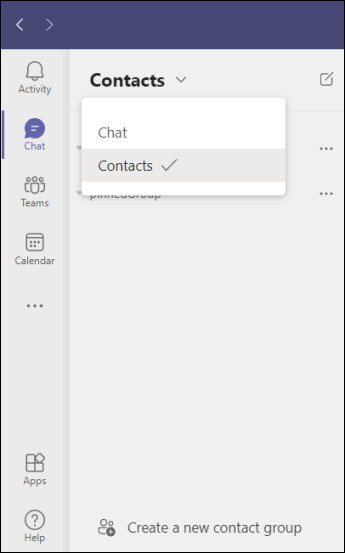
2. Next, select Create a new contact group at the bottom. Name your group and select Create. You can always rename or delete your group later.
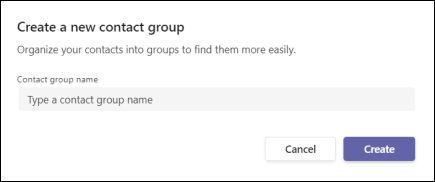
Note: You can create up to 64 contact groups.
History
This displays all of Phone history, both incoming and outgoing.
Your call history is located in the center of the calls experience and shows a list of past calls (including missed calls).
Go to Calls > History. From any call in the list, select More actions > Call back to begin a call automatically.
You can also chat with that contact, add them to speed dial, and add them to your contacts—all from the More actions menu.
How to Check your Voicemail
A Red "badge" will display next to the purple nav bar phone and the voicemail icon in the calls option list if there is an unheard voicemail.
Note: The red badge will indicate the number of voicemails.
1. Click the Calls icon.
2. Click the Voicemail icon.
3. Click the voicemail you want to listen to.
4. Click the Arrow icon to listen to the voicemail. It will also be transcribed if the voice quality is good.
5. Use the ellipsis icon to call back the person, Delete, or any of the other options.
How to Answer a Call
When someone calls you, you'll get a notification in the lower right corner that lets you accept or decline the call.
1. Click Accept to answer with audio only.
2. Click Accept with video to accept the call and enable video as well, if equipped.
3. Click Decline call to decline the call.
The Screenshot below shows calling options:
How to Put a Call on Hold
1. While on a Call, click the Ellipsis (More) icon in your call window.
2. Click Hold.
3. To continue your call, click the Resume button
How to Transfer a Call
There are two types of transfers, a Blind transfer and a Consult transfer
Blind transfer a call.
1. While on a call, Click the Ellipsis (More) icon in your call window.
2. Click Transfer in the call controls.
3. Type the name of the person you want to transfer to or enter the 5 or 10-digit phone number.
4. Click to select.
5. Click Transfer.
The call automatically goes to the transfer to person.
Note: You can only transfer calls when you are in a one on one conversation.
Consult then transfer.
This is used when you need to have a conversation with the "transfer to" person before transferring the caller.
1. While on a Call, Click the Ellipsis (More) icon in your call window.
2. Click the Consult then Transfer in the call controls.
3. Type the name of the person you want to transfer to or enter the 5 or 10-digit phone number.
4. Click to select.
5. Click Consult.
If you entered a phone number vs a contact, consult with the person.
6. Click Transfer or Stop consulting.
If you entered a contact, the call moves to a chat mode. You can chat with them or make the call an audio call before transferring the call.
Chat Option
Audio Option
Start a Call from a Chat
You can make one-on-one or group calls with anyone in your organization directly from a chat without having to host a team meeting. These calls are private and won't appear in any team conversation. Entries for the calls will appear in your chat, though
1. Go to your chat list and click New chat to start a new conversation.
2. Type the name or names into the To field at the top of your new chat.
3. Then click Video call or Audio call to start a call.
Up to 50 people can be on the same video call.
Option, if not in a chat:
If you're not currently in a chat with the person you want to call, you can start a new call from a command.
1. Go to the command box at the top of your screen and type /call
2. Type or select the name of the person you want to reach.
Manage Your Call Settings
These options provide ways to personalize the phone in several areas:
1. Click your profile icon at the top right corner of Teams.
2. Click Settings
General - Can choose Teams screen display theme look. Set the display as a grid or list. Select the language, and specifics about the application start-up closure, and chat app.
Privacy - Set what happens when you set Do Not Disturb, Set Read Receipts to messages, and participate in Microsoft Surveys.
Notifications - This area manages all of your notifications: Mentions, Messages, Meetings, and Status alerts. The notifications have display options including an option to turn them off.
Devices - Select the Microphone, Speaker, and Camera you want Teams to use for calls and meetings.
Calls - This area enables you to set-up:
1. Call answering rules which determines what happens when calls are missed.
-
-
- Can forward calls to a person or voicemail, also ring additional people.
-
2. Setup Voicemail or call routing.
3. Choose specific Ringtones if desired.
This area also manages accessibility, call blocking, and maintains your emergency location based on organization data. See below for details:
Call Settings
1. Call answering rules which determines what happens when calls are missed.
-
-
- Can forward calls to a person or voicemail, also ring additional people.
-
2. Setup Voicemail.
3. Choose specific Ringtones if desired.
This area also manages accessibility, call blocking, and maintains your emergency location based on organization data. See below for details:
Call Answering Rules
unanswered calls can go one of two paths:
1. Set Calls ring me, and optionally Also ring another if desired, and/or be forwarded to voicemail, route to another number or Teams contact, call group, or do nothing.
2. Set Forward my calls to a voicemail, another number or Teams contact, or call group.
Note: Search and select a name or number if choosing a new number or contact option.
Configure Voicemail
Record an audio or text voicemail greeting, set Call answer rules, choose a greeting language, and set out of office greeting.
Device Settings
The system will automatically setup the headset and it will display in the Audio devices section.
1. Click the Make a test call button to verify if the setup is working.
2. Secondary ringer: This sets an additional ringing device, for example your computer in case you are away, and you don't have your headset on.
3. Camera will default to the computer camera if available.
General Settings
Theme, Layout, Application attributes, Language, Delegation options.
Delegation
You can pick someone in Teams to receive and make calls on your behalf; this is referred to as a delegate. When you add a delegate, you are sharing your phone line with them, so they can see and share all of your calls.
This activity must be setup thought the TEAMS desktop application. The instructions are below:
Add a delegate (in the TEAMS phone desktop application)
-
-
- Click on the phone icon in the left navigation bar.
- Click on your Profile.
- Click on the Settings option.
-
You will land on the General option.
-
-
- Scroll down and click on the Manage Delegates button.
-
-
-
- Click Your delegates
- Type the person's name in the search box.
-
-
-
- Check the Make calls and Receive calls boxes. The Change call and delegate settings are optional.
- Click Add.
-
Your delegate will receive a notification in TEAMS letting them know about their new status.
Now the person appears in your delegates list, which will be a default section in your call forwarding and simultaneous ring options.
-
-
- Delegates can see when you are on a call and who it is with.
- Any calls made or received by you or on your behalf can be put on hold or resumed by you or your delegates.
-
Make and Receive Calls as a Delegate
Once you've been added as a delegate, you can make and receive calls on someone else's behalf. When you initiate the call a pop up will appear:
-
-
- Choose who is making the call. The call will then initiate.
-
Delegates can see the calls made and received on their behalf in their main calls list.
Change your Delegate's call settings
As a delegate, you can view and edit call and delegate settings on behalf of someone else.
- Select Settings and more
 next to your profile picture at the top of Teams and choose Settings > General.
 - Select Manage delegates under Delegation.
- Click People you support. Here, you'll see a list of the people you're a delegate for. Hover on any name in the list and hit More options
 to see your choices: View permissions, Change delegates, and Change call settings.
 - Choose View permissions to edit the permissions of any of your boss's delegates, Change delegates to add or remove delegates for your boss, or Change call settings to adjust their call settings for them.
Notification Settings
Mentions, Messages, Meetings, Status, and more.
Manage Blocked Calls
Microsoft Teams allows you to block problem or spam callers numbers from Call History. Once you do this, inbound callers from that number will be ignored.
Step 1: Go to your Calls tab within your Teams application and select the History option (this can be done on your desktop PC or mobile client) 
Step 2: In your calling History find the number you want to block. Once found, select the 3 dots (ellipses) on the right hand side of the number and select the Block option (as seen in the picture above).
You can centrally manage all the numbers you have blocked from Settings -> Privacy. From there, under Blocked Contacts you’ll see an option to “Edit blocked contacts“. Select that to see the list of the PSTN numbers you’ve blocked.
Note: You’ll also notice that you have the option of blocking all calls that don’t have a Caller ID
Use the “X” to remove any numbers from the blocked list: